

A Love Story, Part 3 of 5
/
Click here to read the first installment...
THE SECOND RESTORATION
The Texas World Speedway at Bryan, Texas was chosen as the site for the 2004 ‘Gathering of the Clan’ reunion for Allard owners. In 1969 I had opened the then-named Texas International Speedway with my Allard, the only one there. So I felt it imperative that I attend this Gathering. The car was not in shape for show, so in December 2003 I started a clean up that grew into another frame-off restoration. The completion date had to be no later than October 31, 2004.
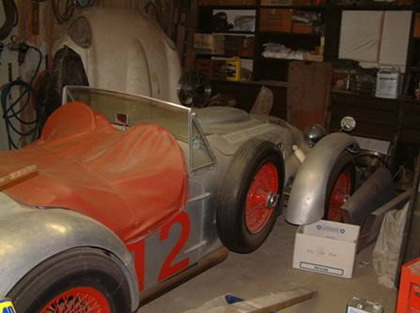
The 13 years in storage had done considerable damage to the car. A mysterious little black wasp had plastered every hole in the car with a white cement so hard that you had to use a jack hammer to get it out. I found paint peeling from the frame and the car was simply shoddy. There was no way I was going to take it to an Allard reunion in this condition. So, I decided to do another full restoration.
I stripped the body off, leaving only the center cowl section where all the electrical is located. The wiring was in good shape, but the brake tubing was in poor shape. At this point I decided to do all the work that I had previously intended to do on the car. This included new door hardware, replacing the touring wind screen with racing screens, installing stainless steel brake lines, installing a pair of Marcel driving lights that I had put in storage years ago, installing an electric cooling fan, and replacing the Cad-LaSalle transmission with a new special made Ford “toploader” 4 speed transmission. I also decided to have all the chrome work re-done.
While the engine had been in the car since 1961 and only had about 5000 miles on it, most were hard racing miles. Also the car had been stored for long periods of time. For these reasons I thought it best to freshen the engine with new rings and bearings, etc. I usually do this work myself, but time was short. So I took the engine to my friend, Dennis Murray at Precision Engine Service for rebuilding. The crank was polished, the cylinders were lightly honed and the block cleaned. The cam was inspected for wear and identified as ¾ race. New hardened valve seats were installed to compensate for un-leaded gas and new rings, inserts, cam bearings and push rods were installed. Then the whole thing was balanced to perfection.
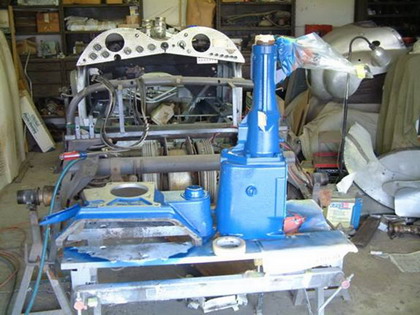
The suspension, the steering gear unit, and brake lines were removed, leaving the bare frame. The frame was cleaned to bare metal, and then acid cleaned. The frame was then washed down with solvent and spray painted with epoxy primer and two coats of silver enamel – matching the original color. In the mean time I was working on the front end and front brakes. The silent block bushings were still good but cracking. Inexpensive replacements are available in England, so they were ordered. I had Precision Engine Service press the old bushings out, and the new bushings pressed in.
Installing the front suspension is a real challenge! It requires the use of a jack, a crow bar, a rawhide hammer, a large drift and considerable patience to get it into the position for installing the through-bolts. Installing the coil springs is another problem, as you cannot use a spring compressor! You must place the spring into its seats, then place a compression jack around the frame and under the axle to compress the spring by jacking the axle up in place. The spring is held in place by a U shaped fabric strap that passes under the axle and is then bolted to the frame. This strap actually becomes a limit strap. For racing safety, all bolts in the front end are safety wired or cotter keyed.
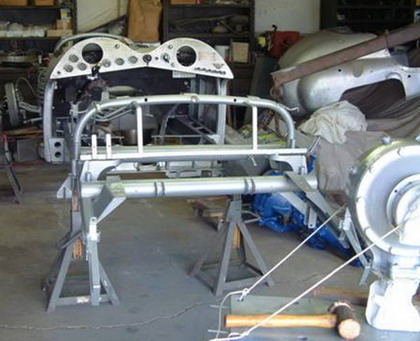
Painted frame with front end installed
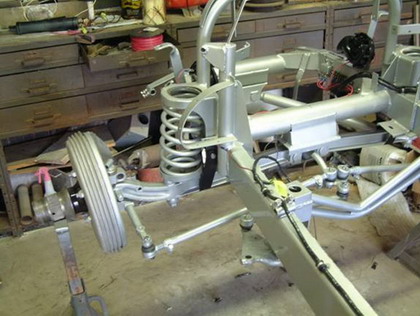
Front suspension with steering installed-note new brackets for driving lights above spring and black limit straps. Brake lines have not yet been installed.
Allards used two type rear ends, stock 37-41 Ford with solid axles, and a Ford rear end that was modified into a DeDion to obtain independent suspension. ‘The Bitch’ has the latter. All of you that collect Fords know that 37-41 Ford rear ends are attached to the transmission using a torque tube with the drive shaft inside. This setup for my new transmission would require cutting the torque tube to about 18” long and having a connector machined to adapt it to the new transmission, as well as modifying the transmission’s tail shaft to receive the adapter. All in all it would be a major project. I intended to do this, but while searching for parts on the Internet, I happened on a hot rod company that makes an adapter that will permit using an open drive shaft. This was the answer to my problem. After the engine was installed I measured the distance between the transmission tailpiece and the adapter and ordered a new open drive shaft. The fit was perfect!
The rear end was completely dissembled and bearings checked for wear, seals were replaced. The U joints were replaced in 1990 and were still as new. The new adapter was installed, and the ring and pinion adjusted for proper gear lash. However the wear on the gears did not permit any gasket/shims to be installed. While the rear end has a lot of life left in it, there is slop in the gears and sooner or later it will have to be completely rebuilt. The rear end was painted and installed.
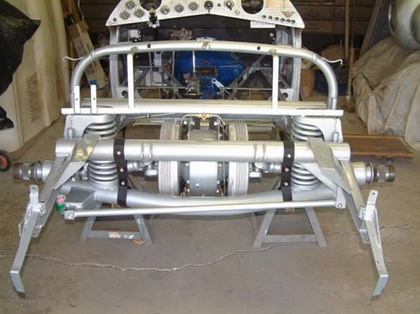
DeDion rear end with black fabric limit straps installed.
The new transmission arrived on schedule and I was ready for the engine – but the engine was not ready for me. I constantly bugged Dennis, and three weeks later it was ready. I installed a new Centerforce clutch and throwout bearing on the flywheel. The throwout bearing was a problem to install as it did not exactly fit the Ford clutch fork. But with some grinding here and there, a fit was obtained. The engine, bell housing and transmission were painted Ford blue and installed on the engine.
Bell housing and transmission painted
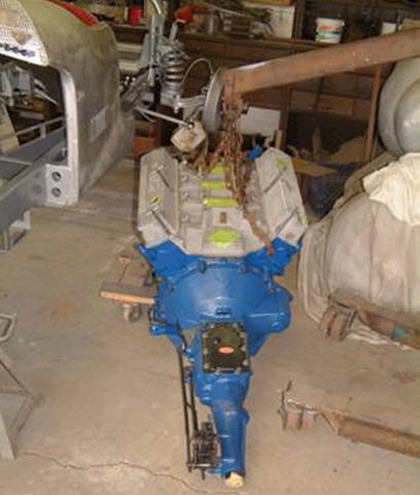
The engine painted and transmission installed.
-Bill Bauder